SSH Access and Private Key Management
Run Box instances can be accessed remotely over SSH. SSH access requires a private key (a PEM file), which is issued and reissued from the dedicated private key management menu.
This document covers how to issue and manage private keys as well as how to connect over SSH.
Private Key Overview
The private key is sensitive security information used to verify your identity when connecting over SSH. The key can be downloaded only once, immediately after it is issued.
Once issued, the private key cannot be downloaded again, so be sure to store it in a safe location.
When you reissue a private key, the previous key is no longer usable.
Issuing a Private Key
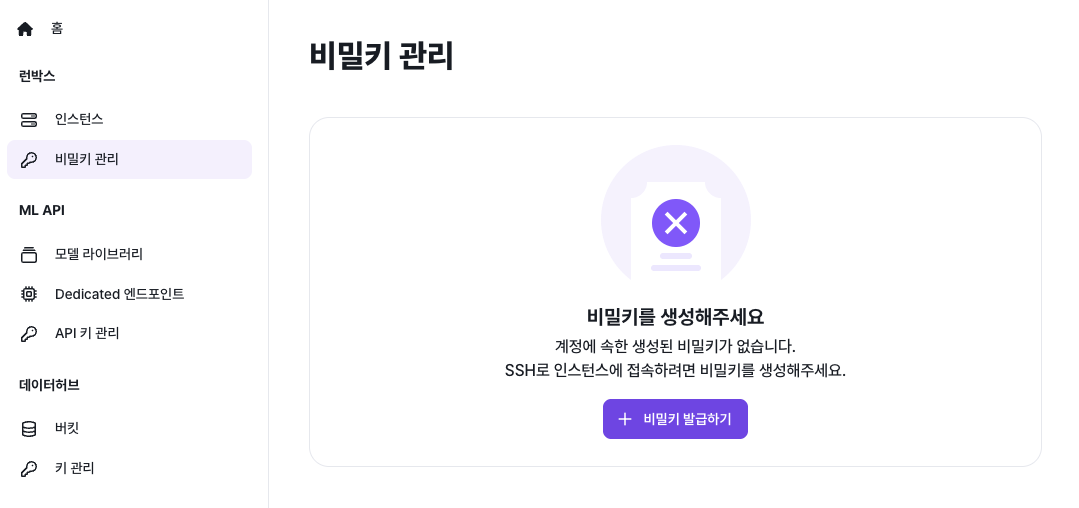
- From the top menu, go to Run Box → Private Key management.
- Click Issue Private Key.
- When issuance completes, click the PEM file download button to download the
*.pemprivate key file. - The downloaded key cannot be re-downloaded later, so keep it in a safe location on your local machine (for example,
~/.ssh/elice-cloud-runbox-xxxx.pem).
⚠️ Warning: The private key file is sensitive. Minimize sharing. If you must share it, avoid uploading it to shared PCs or shared storage (shared folders, Git, etc.).
Reissuing a Private Key

If you lose the key or suspect it may be compromised, reissue it to get a new one.
- Go to Cloud On-Demand → Private Key management.
- Click Reissue Private Key.
- When reissuance completes, download the new key.
⚠️ Note: Reissuing immediately invalidates the previous key, which can no longer be used for SSH access. Proceed carefully.
SSH Access (Using a Built-in OS SSH Client)
With your private key ready, you can connect to your instance using the SSH client built into your OS.
Find the Connection Details
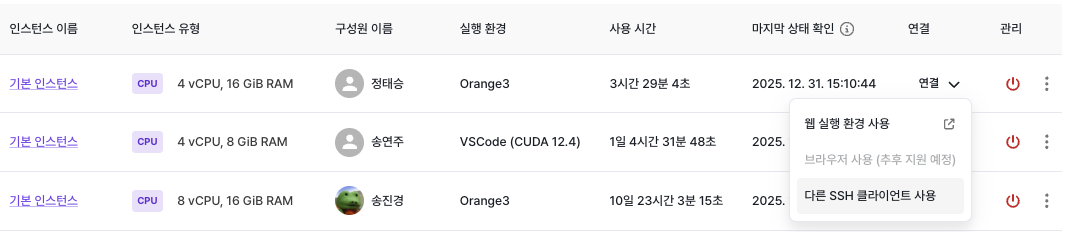
- From the My Instances page, select the instance you want to connect to.
- Click Connect at the top, then select Use another SSH client.
- The SSH connection guide popup shows:
- Username (e.g.,
elicer) - Host address (e.g.,
central-01.tcp.tunnel.elice.io) - Port number
- Path to the private key file
- Username (e.g.,
From the instance list, select the instance you want to connect to and click Use another SSH client.
Example Connection Command
In your terminal, locate the private key and connect using the following form:
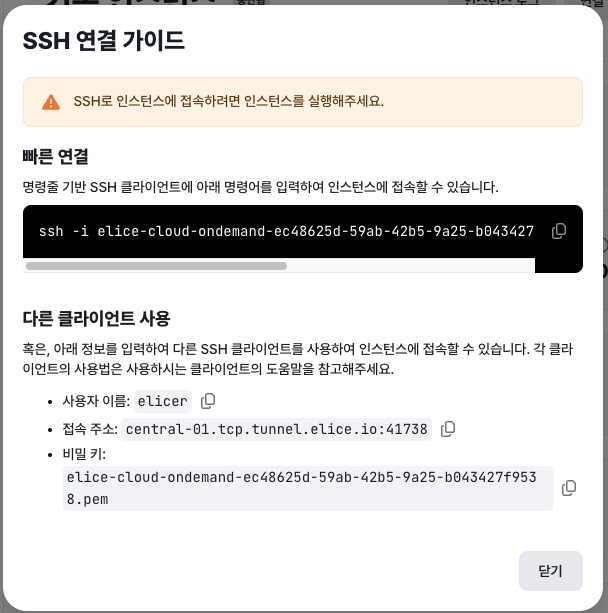
ssh -i [path-to-private-key] [username]@central-01.tcp.tunnel.elice.io -p [port]
Private Key Permissions (When Access Fails)
In some environments, if the private key file's permissions are too permissive, SSH's security policy will block the connection.
If you see an error like the following when connecting:
Permissions 0644 for 'elice-cloud-ondemand-xxxx.pem' are too open
macOS / Linux
Tighten the key file permissions and try again:
chmod 600 elice-cloud-ondemand-{...}.pem
Then run the same SSH command — it should connect normally.
Windows (PowerShell / OpenSSH)
On Windows you don't use chmod; instead, adjust the file owner and ACL. Use one of the methods below.
Method 1) Restrict permissions in PowerShell (recommended)
- Open PowerShell as administrator.
- Run the following (replace the filename with your actual
.pem):
icacls .\elice-cloud-ondemand-xxxx.pem /inheritance:r
icacls .\elice-cloud-ondemand-xxxx.pem /grant:r"$env:USERNAME:(R)"
/inheritance:r: remove inherited permissions- Grant read permission only to the current user
Then run the same SSH command again.
Method 2) Use the file properties (GUI)
- Right-click the
.pemfile → Properties → Security → Advanced. - Click Disable inheritance.
- Click
Remove all inherited permissions from this object.
- Click
- Permissions → Add → Select a principal.
- Enter your Windows user account name in the object name field and click OK.
After saving, try SSH again.
📌 Note: If the key file lives in your Downloads folder, a public folder, or a shared drive, permissions tend to be too broad. If possible, move it to a personal folder like
C:\Users\<user>\.ssh\before continuing.